
Salesforce Lightning Web Components - Part 2
1st CRUD Example
Vincent Harriott
March, 2020
CRUD Example using Lightning Web Components
In the first part of our blog we built a simple but important “HelloWorld” app using LWCs. Next we will build a basic CRUD example. When learning new technologies, we typically customize our CRUD applications to satisfy the use cases for potential new clients.
Forgive me if you already know this, but CRUD stands for Create, Read, Update, and Delete. After we have built a CRUD application using a new programming language and/or a new platform, we’ll have learned a fairly good amount about how that software / platform really works.
Using LDS Base Components
Lightning Web Components come with a set of Base Components built on the Lightning Data Service (LDS) that let us create forms that let users create, view, and edit Salesforce records WITHOUT writing a single line of Apex. The Base Components are the easiest way to work with records. Later we will demonstrate using an LDS wire adapter, which will give us more functionality and flexibility.
Using lightning-record-form to Create a Record
We’re going to start by creating an Account using the Base Components. Our component will be added to an Account Record page, to enable users looking at an account to create an additional account, possibly to contain information from the existing account record.
Code: createAccount.html
In our HTML file we use the Base Component lightning-record-form, which creates a form that supports view, edit, and read-only modes. This file will display an array of {myFields} from the {accountObject}, which are bound to our JavaScript file.
Code: createAccount.js
The accountObject is imported from the org in which this component will be installed.
The array myFields contains the Name and Website fields from the account object. The fields are imported using a similar reference, just going down to the field level.
As seen in the HelloWorld example, createAccount.js uses the export default class [ClassName] definition to pass the bound variables up to the HTML, to be displayed to the user.
Code: createAccount.js-meta.xml
Nothing new here. Just note that we will be using the component in a Lightning Record Page. In our ultra-basic HelloWorld app, we used the component in a Lightning Home Page.
Deploy createAccount to a Dev Org
We can use the same steps shown above for the HelloWorld component to deploy createAccount to our dev org, but I’ve learned a bit of a shortcut so I’ll try it now. Instead of right clicking on the force-app\main\default folder, I’m going to right click on the createAccount folder instead. This method is valuable when you have a whole bunch of components at the same level, but you only want to deploy changes to a single component to production.
Here’s the screen shot using this method. We see that the option SFDX: Deploy Source to an Org is there even though we are only right clicking on the createAccount component.
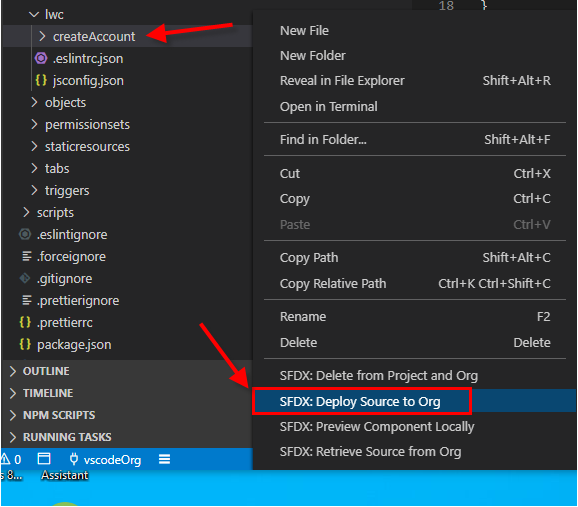
If our code contained any errors, they would appear during the deployment attempt. We didn’t have any errors so we see the success messages:

Add the Component to a Record Page in Lightning Experience
Just like with HelloWorld, we now go on to our Dev org to configure the component so users can use it to create new Accounts.
- From VSCode, open the Command Palette then select SFDX: Open Default Org.
This automatically opens our Dev org.
- Go to Setup and in the Quick Find box type “Lightning App”, then select Lightning App Builder.
What we will do now is add our component to an existing Record Page. The component configuration file enables us to create/add to Home Pages, Record Pages, and App Pages in the Lightning Experience.
- In the App Builder we locate our new createAccount component and drag it to the right column of the Account Record Page.
- Save and Activate the component.
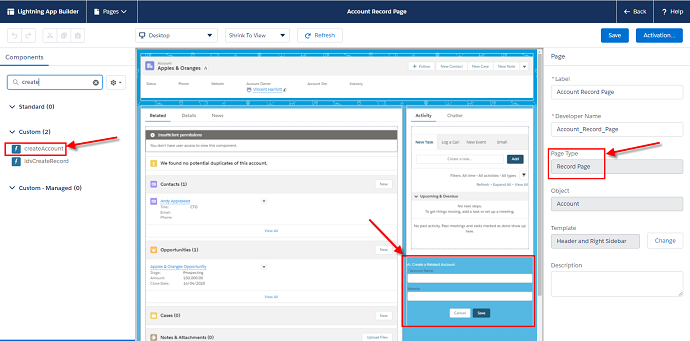
To test the component we just need to go to any account record.
We will see our lovely new Lightning Web Component in the lower right corner.
- Add a new account with an optional website name, then use the standard Salesforce UI to see it.
We have now done the C (Create) in our CRUD application. Three more letters to go!
Using lightning-record-form to View and Edit a Record
The same LDS Base Component we used to Create a record in Salesforce can be used to View and Edit a record.
We will not repeat any VSCode Command Palette instructions. They will not change from the prior components so there is no need for repetition. We will present the code, discuss it, and demonstrate how it looks on our Dev org.
Code: viewAccount.html
As mentioned above this is the same Lightning Base Component lightning-record-form. Here are the differences:
- The record ID (record-id) of an object in your org
- The name of the object (object-api-name)
- The built in type of layout to display the data (Compact)
- The mode (view), which in our case lets users both Read and Edit the record.
Code: viewAccount.js
The meat in the meal here is just the single line of code inside class ViewAccount. This code exposes the recordID property, which was imported from the lwc, to the HTML file.
Code: viewAccount.js-meta.xml
Nothing (new) to see here. I’m just including it because we’re going to deploy the component to our Dev org and build a Lightning Record Page with it.
Deploy viewAccount to a Dev Org
We followed all the same steps we did for the previous LWC createAccount and successfully deployed viewAccount to our Dev org.
But instead of adding our component to an existing Lightning Record Page, we created an entirely new page.
Add viewAccount to a New Lightning Record Page
- Start the Lightning App Builder, then click on New.
- Select Record Page, then click on Next.

- In the Label field enter “LDS View Account Record Page”.
- In the Object field select “Account”, then click on Next.
The "Create a new Lightning page" dialog box appears:
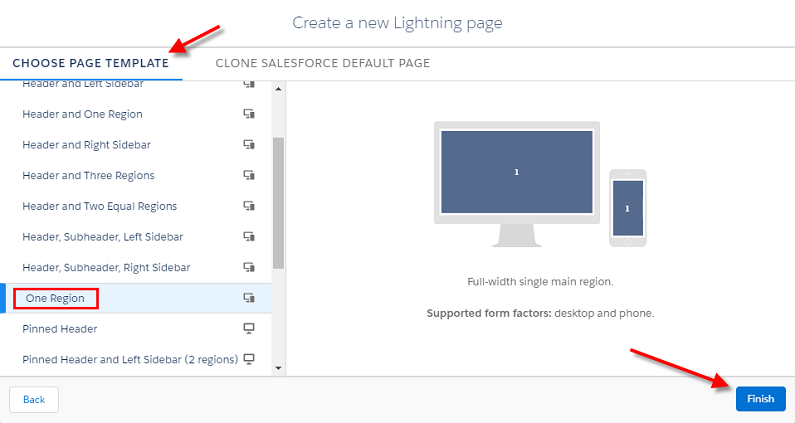
- Under “CHOOSE PAGE TEMPLATE” we select “One Region” and then click on Finish.
- In the left pane of the Lightning App Builder, we locate our new viewAccount component and drag it into the center region labeled “Add Component(s) Here”.

- Click on Save then click on Activate.
- On the Activation: LDS View Account Record Page, select APP DEFAULT.
- Click on Assign as App Default.
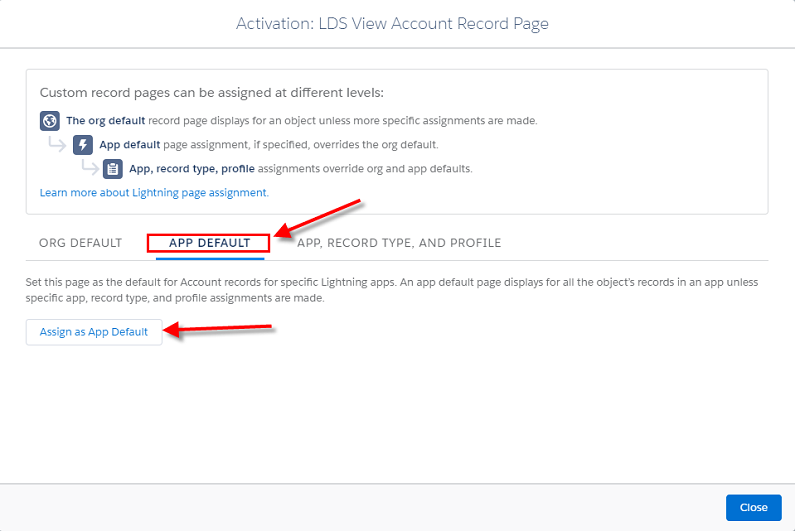
Now when we assign this page to a Lightning App, this page will be the default Record Page for Accounts in that app.
- We add our new Lightning Record Page to an app we previously created named ‘LWC’, then click on Next:
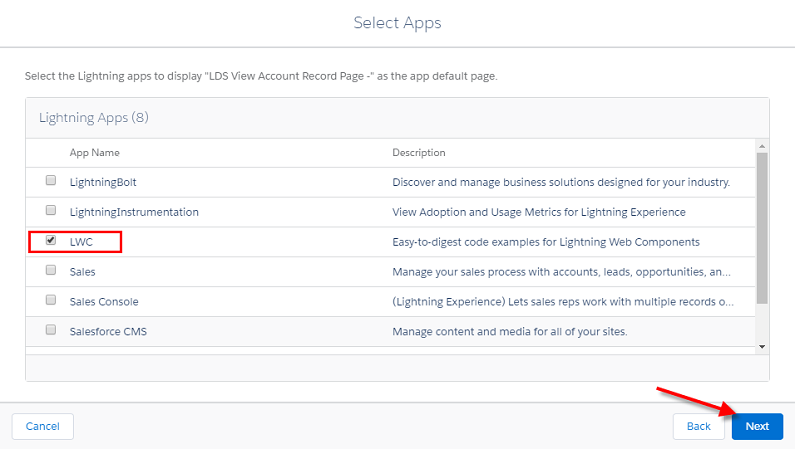
We’re finally done with all the config! Now let’s see our new Lightning Record page in action.
- We click on the App Launcher, the type LWC in the search bar to locate our LWC app:
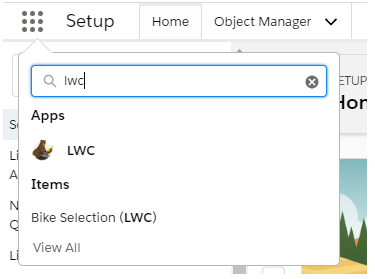
- If the Accounts tab is not visible by default when the app opens, we find it by again using the App Launcher and looking under the Items section.
- Click on the Accounts item or tab and then click on any Recently Viewed account from the list.
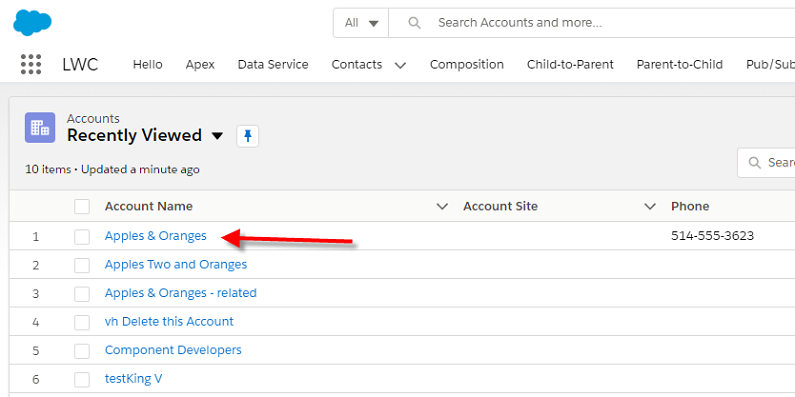
At last! We have our LDS Base Component on a Lightning Record Page that lets us View an account record:
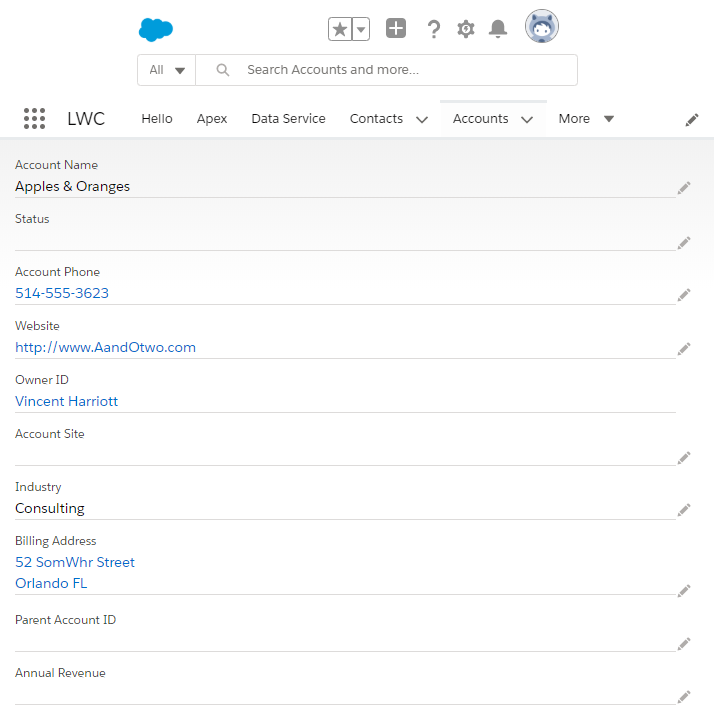
But wait!
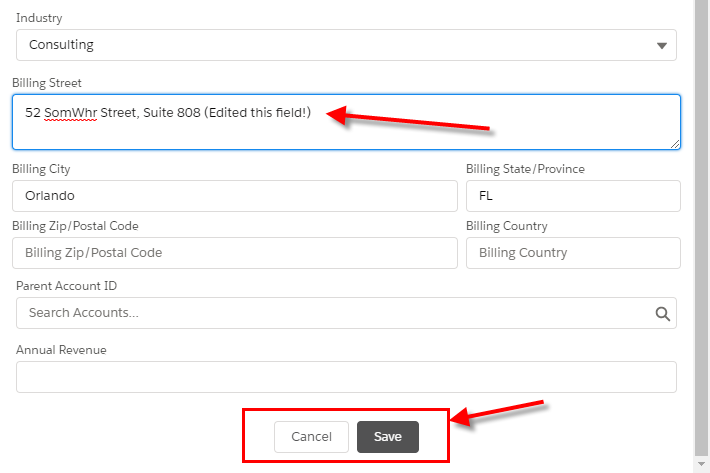
Did you notice the crayons to the right of almost all of our account fields? If you’re familiar with the Lightning UI then you know that the crayon means the field is editable. If we click on any of the crayons on the form the Lightning UI automatically changes the form to Edit mode, and automatically adds Cancel and Save buttons to the bottom of the form:
Summary: Using LDS Base Components
So now we have demonstrated CRU (Create, Read, and Update) using Lightning Base Components. But where is Delete? Well is appears Delete is not supported by the Base Components. I assume the Lightning developers found that Salesforce’s default UI provides good enough methods for deleting records.
This omission contributes to my analysis of the Base Components: they are good for teaching, good to quickly show Lightning in action, but not very useful when it comes to standard, normal business applications.
Anyone who has read any of my articles, knows that I never force my opinions. Instead I present working software examples, so the readers can study, modify, and test them to make their own conclusions.
Now we will use lightning/ui*Api to delete an account record, and upgrade our example to use CRUD using wire adapters and JavaScript functions, and No Apex!
Lightning/ui*Api to Delete a Record
JavaScript functions and wire adapters are built on top of the LDS and User Interface API. We use these wire adapters and functions to work with Salesforce data and metadata.
Lightning/uiRecordApi
This module has wire adapters to record data and to get default values for creating records. It also has JavaScript APIs to create, update, delete, and refresh records.
We’re going to create a LWC that adds a delete button to an account record page.
In VSCode, we create another LWC called deleteAccount. Below are each file in the component.
Code: deleteAccount.html
Anyone who has any Salesforce System Admin or Developer experience knows that in order to delete a record you need its unique ID: its record ID.
Let’s look at the lightning button. When it is clicked it takes the bound variable recordId and executes deleteAccount() in the JavaScript. We will see where the record ID comes from when we look at the JavaScript.
Code: deleteAccount.js
Yes there’s a lot more in here than we’ve seen in our previous JavaScript files. I’ll focus on what’s important for the Delete operation.
import { deleteRecord } from 'lightning/uiRecordApi';
This line of code imports the deleteRecord function from the LWC lightning/uiRecordApi. This is the JavaScript function that will actually perform the delete.
@api recordId;
The @api decorator exposes the recordID property as public, so it can be referenced in the HTML / template file.
NOTE: A field can have only 1 decorator.
const recordId = event.target.dataset.recordid;
During execution of DeleteAccount(), this line populates a new constant named recordID from the ID of the Account that hosts the Delete button of the lightning component. We should keep in mind that we’re building a lightning component that can be shown on account record pages
deleteRecord(recordId)
JavaScript function from the lightning/uiRecordApi that deletes the sObject record identified by recordID.
The other code in this file shows standard Lightning UI messages if the delete was successful or if it failed. If the action was successful the code sends the user to the default Account page.
Code: deleteAccount.js-meta.xml
We’ve seen parts of this code in all of our previous component configuration files. In this case we will only use our new component on a Lightning Record Page, so we identify that target and expose the component to the Lightning App Builder.
After we created each of the above files for our new Lightning Web Component, we deploy it to our Dev org using the same methods we used for our other LWCs: Right-click on the deleteAccount folder and select SFDX: Deploy Source to Org
After verifying a successful deployment, we go to our Dev org and again open the Lightning App Builder.
We will add our new LWC to an existing Lightning Record Page. For our org we choose a Record Page named "Account Record Page". After finding that page in the list of Lightning Pages we click on Edit.
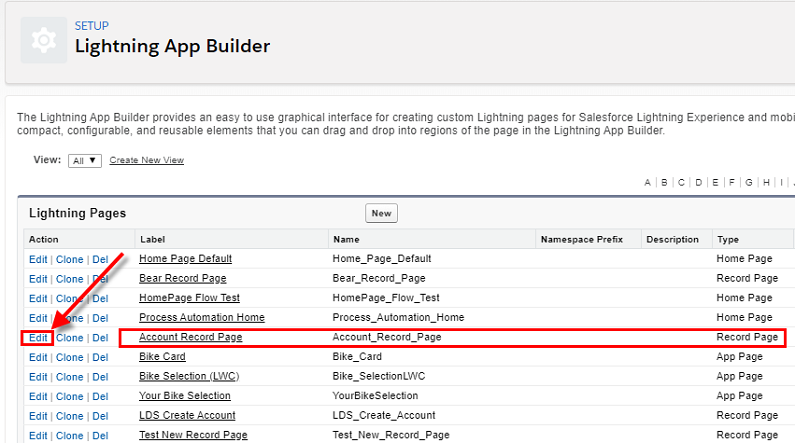
Just like configuring our previous Lightning pages, we locate our component in the left pane then drag it to the center design pane. We place the deleteAccount component on the bottom left section of the Account Record Page.

We Save and activate this page, setting it as the Org Default for the desktop.
We verify the operation of the deleteAccount component by going to an unneeded test Account, locating the component and clicking on the delete button.
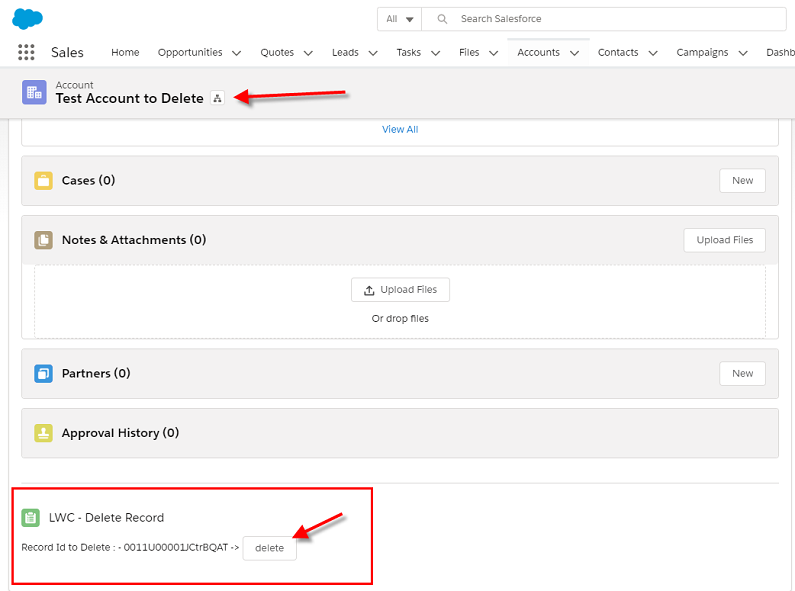
Notice the record ID in the component?
When we click on the delete button, the record is deleted and we are taken to the default Account page with this message front and center:

This is a standard Salesforce Lightning alert called a toast message. There is a section in our JavaScript in the deleteAccount function that displays this message:
this.dispatchEvent(
new ShowToastEvent({
title: 'Success',
message: 'Record Is Deleted',
variant: 'success',
}),
);
First CRUD Summary
Let’s review what we’ve done to demonstrate CRUD.
LDS Base Components for Create, Read, and Update
We used the Base Components, which are built on the Lightning Data Service, to perform Create, Read, and Update on account records using the lightning-record-form in our component template (HTML) files.
We attached our first LWC createAccount to an existing Account record page to Create a related or sub account.
Our next LWC is named viewAccount. We created this component to be able to both Read (View) and Update an account. We created a new Account Record Page and added this component as the main content for the page.
Lightning / uiRecordApi for Delete
Our next LWC is named deleteAccount, and is our largest LWC because it uses the uiRecordApi and other Lightning resources. We added deleteAccount to an existing Lightning Record Page.
When a user clicks on the Delete button in the component, the account record is deleted and the user is re-directed to the default account page. On that page a success message is shown.
What's Next?
The third and final part in our Lightning Web Components series will be a complete, customer-ready Lightning App made with several LWCs working together and exchanging data.
Since we inroduced the uiRecordApi to use its deleteRecord function, our next example will use its other methods createRecord and updateRecord.
Stay Tuned!